13 December 2016


I would like to thank all my customers for your custom this year and wish you all a Merry Christmas and a Happy New year.

I have not been on holiday this year so I will be taking a much needed break over the Christmas & New Year period.  I will be on holiday from the 17th December to the 3rd January.

Orders can still be placed through my websites during this period but orders won't be made up and dispatched until w/c 3rd Jan 2017.

I will dispatch orders as quickly as possible from 3rd January but there are likely to be some delays while I clear the backlog.  

Best wishes,
Jennifer, 

24 July 2016

Lighting Talk at Lichfield Dolls House Club

On Wednesday (20th July) I travelled down to Staffordshire to do a talk / demonstration on lighting dolls houses at Lichfield Dolls House Club.

I arrived a bit early to avoid any problems on the M6 and was very kindly hosted by their president Gaynor.  It turned out to be a baking hot day so not having to sit in a car park for an hour was very much appreciated!

I knew a couple of the ladies already from previous talks / workshops and having done a few of these now I was a lot less nervous than I used to be!

Talking about LEDs.
 I gave an introduction to LEDs and why they're great for dolls houses and other model projects (don't get hot, last a lifetime and very efficient) and then showed quite a few examples of different types of LEDs and how they can be used, as well as some of the advances in technology using programmable microchips that allow for more impressive lighting effects such as my Lighthouse Beacon and remote control switching on and off of lights in a dolls house.


I then gave a demonstration on using one of my kits to light a 1/48th dolls house and I think I convinced a few of the ladies that it's a lot easier than they thought.

1/48th Bluebell Cottage lit during the demonstration
I really enjoyed my visit and would like to thank the ladies again for inviting me and supporting my business.
Thanks also to Paul for taking the photos during the evening.

Jennifer,

24 March 2016

Model Railways: Running Flashing LEDs from DCC power


LEDs require a stable DC power supply (Direct current) (apart from a few special LEDs). This means the current only flows in one direction and it’s a very stable supply. Mains power is AC (Alternating Current) and that flows back and forth very rapidly. 

Flashing LEDs have a small inbuilt chip to make them flash and they are very sensitive to instability in current or not enough current so occasionally they cause problems. Typically, they will light up but not flash.
If you find your 12v flashing LED won’t flash I can guarantee it will flash if hooked up to a 9v PP3 battery. This is because battery power is incredibly stable. 

DC output transformers convert AC into DC usually via a full wave bridge rectifier and this is usually sufficiently stable to run flashing LEDs but occasionally you can get problems. This is especially prevalent with DCC power supplies because their output can be less stable and is more akin to AC. LEDs are sensitive to reverse polarity so with DCC is essential to use a bridge rectifier between the power supply and the LEDs to stop any reverse polarity. Bridge rectifiers only allow current to flow in one direction. 

I’ve never used DCC power supplies but a customer found that his Belisha Beacons wouldn’t flash when used with 12v and 14-15v DCC power supplies but when we worked out the problem he provided the following diagram and information for the benefit of others. 


“Most transformers that say they are DC are full wave rectified and produce a saw tooth voltage, which the led does not like. 

The answer is to put a smoothing capacitor across the output, before the led. I found that a 2200uF 35V electrolytic worked perfectly. It smooths out the rough DC to a near perfect straight line and the beacons happily flash away.” 

I hope this is helpful

Jennifer, 

31 October 2015

Sotheby's Window Display & my lighting!


When I get a sale, I rarely know upfront what the products are being used for.  I'm very lucky in that frequently customers e-mail me with a photo or two or just a friendly e-mail to let me know.  
This is probably my most exciting set of customer images, just because they're from the window display of Sotheby's in London right now! If anyone is passing please have a look.
Celia Lindsell (a designer - www.celialindsell.com) bought ceiling spotlights from me and has lit her dolls house display, both traditional and modern dolls houses, with the lights. I'm sure you'll agree the dolls houses are wonderfully done and it's great to see the lighting working so well.


Sotheby's Window Display - Ceiling Spotlights

Sotheby's Window Display - Ceiling Spotlights

Sotheby's Window Display - Ceiling Spotlights

17 September 2015

Talented Miniaturists

I have three customers this month who have won competitions with a little help from my lighting products.  One used red Nano LEDs in a magic trick to win the World Championships and another has won the Best Large Miniature in a Warhammer 40K competition in Norway using LED lights and a servo to turn the tank turret and then there's the miniaturist I'm going to feature in this blog post who has won 1st prize in the Hungarian Dolls House and Miniatures contest for her stunning Cape Cod Living room.

Orsi of Orsi's Miniatures is probably familiar name to many of you and has blown me away on numerous occasions with her stunning miniature creations.

I first worked with her to provide lighting for a recreation in miniature of Sherlock Homes's kitchen and since then we've worked on a few projects together but the latest is noteworthy in that it won her the 1st prize and a lovely trophy.  So without further ado I'll show you the pictures!


Orsi's Miniatures Cape Cod Living Room. 
Stunning isn't it!  

The overall lighting is provided by LED spotlights in the ceiling.  There is another LED in the table lamp and hanging lights, warm white nano LEDs light up the bookshelves and a flickering fire kit provides a realistic glow in the fireplace.

Orsi's Miniatures - Flickering Fire and Nano LEDs in the bookshelves
Orsi's Miniatures - Nano LEDs light up the bookshelves
The Nano LEDs are typically used for smaller scales but here you can see just how effective they can be in 1/12th scale for lighting up smaller areas like these bookshelves.  The Nano LEDs are just 1.5mm long but give off an incredible amount of light and with their tiny size they are easily concealed.

Orsi's Miniatures - Miniature or real??
The attention to detail throughout this wonderful miniature is testament to Orsi's skill and vision.  I am delighted that my lighting helped bring this room to life.

Jennifer, 

14 June 2015

Tutorial - Miniature Trees, Bushes & Topiary

Following on from my last tutorial on curved fencing (click here if you missed it) I am now going to look at making trees and bushes from Seamoss and topiary ball trees.  This tutorial is applicable to all scales if sizes are adapted to suit.

Seamoss Trees & Bushes


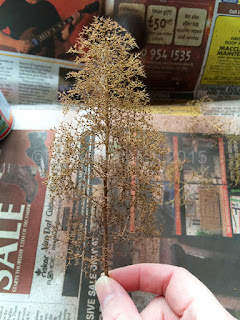
Seamoss Tree in 1/48th Scale


Seamoss is a natural plant material that is very useful for making trees in 1/48th or railways scales and also bushes in 1/48th, 1/24th. 1/12th scales.

It naturally forms branching structures so it's a bit easier to use than wire where you have to shape it yourself but is fairly fragile so care must be taken when handling.  If branches break off you can glue them back on with tacky glue or superglue.

Step 1:  Seamoss has little leaves on it which need to be gently removed with tweazers.  You can also remove or reattach any broken branches and shape as required.  Trimmings can be used for bushes and small plants.  If you want a thicker trunk you can add a bit of air dry clay or even pieces of masking tape to the lower truck before painting.

Seamoss with leaves removed and trimmings kept
Step 2:  Seamoss is naturally a yellow colour so it's best to first spray it brown with spray paint.  I have used a mid brown by Humbrol.

Spray painting the sea moss
Painted Seamoss Tree
Step 3: Add scatters.  I have chosen to use fine scatters in a mix of light and dark green.  The dark green is applied first and goes on the underside of the branches to add depth and shadow.  The light green goes on to the upper side and branch tips to show fresh growth.

First give a good coat of hairspray which enables the scatter to 'stick' to the seamoss.  Any cheap hairspray is fine or you can use artists matt spray sealer.

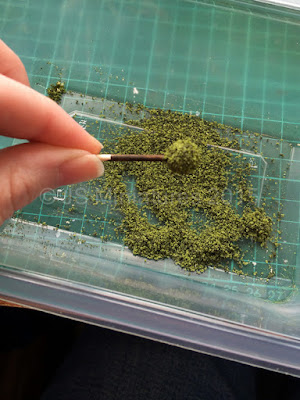
Sprinkle on the scatters.  I recommend doing this over a tub /container so you can keep the rest to reuse.

It's a good idea to use an old paintbrush to carefully remove scatter stuck to the truck or branches where it doesn't look natural.

Once you are happy spray the tree with spray adhesive and then another coat of hairspray to help the scatter stick.  Spray adhesive is quite good for seamoss because it's more fragile so doesn't risk breaking any branches etc.
The alternative is a mix of 4 parts water to 1 part PVA and a drop of washing up liquid in a clean garden or household sprayer but I find you struggle to get a fine enough mist for the seamoss.

If there's any bits where scatter hasn't stuck you can dip into PVA glue and apply scatter that way.

Leave to dry.  Once dry it should be pretty robust as the glue helps firm up the structure.

Tip: Seamoss can also be used for larger trees if you break down the pieces and use the smaller pieces as finer branches on a wire tree or other model tree framework.

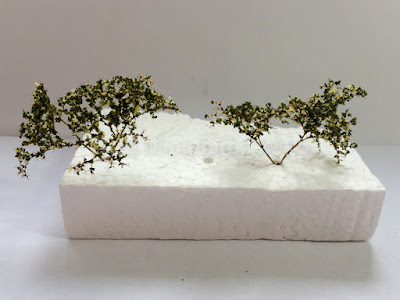
Bushes:  Bushes are done in the same way but you can also use a brightly coloured scatter to suggest flowers.
In this example I've use a fine green scatter with yellow through it.
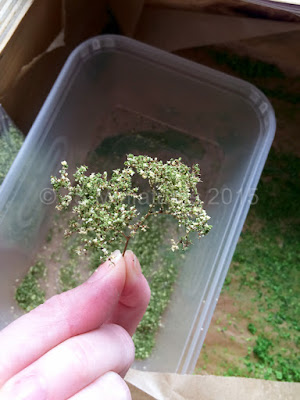
Seamoss Bush
Seamoss Bush

Seamoss Flowering Bushes
Materials Required:
Links provided where I sell the item

Seamoss
Scatters in dark and light green
Hairspray or artists matt sealer
Spray adhesive or PVA glue (thinned)
Tweezers
Brown matt spray paint


Topiary Ball Trees

Topiary ball trees can be made for any scale.  Just select the appropriate size polystyrene ball.  Here I've made 1/12th scale ones using 20mm balls (25mm would also be suitable) and 1/48th scale ones using 10mm balls.
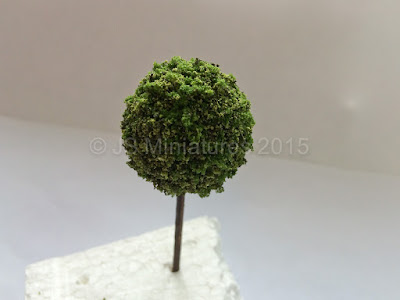
1/12th Scale Topiary Ball Tree
Step1: Glue a cocktail stick into the hole of the polystyrene ball - leave loose for 1/48th scale as we will replace with wire at the end and leave to dry.

Step 2: Paint the polystyrene balls brown using acrylic paint.  I used DecoArt crafters acrylic in chocolate.  Leave to dry.
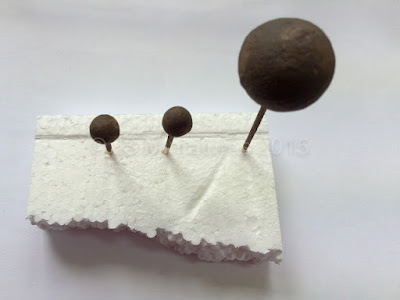
Polystyrene balls painted brown
Step 3: Spread PVA or tacky glue over the ball, trying to get as even as possible.  It can be thinned slightly if required but you don't want it running off!

1/12th scale ball with glue

1/48th scale ball with glue

Step 4: Mix together two tones of green scatter.  A dark and light green works nicely in a medium/course grade for 1/12th scale and a fine grade for 1/48th scale.

The dark green is the older growth and the light green represents the fresh growth.

Sprinkle over the glue covering all areas.  It's best not to touch the ball as the scatter will stick to your finger rather than press to the ball.  You can add more glue and scatter afterwards as required.
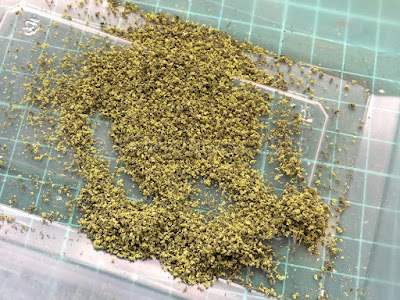
Mix of fine scatter for the 1/48th scale ball

Applying scatter to the 1/48th scale ball
Spray with hairspray to help hold the scatter and then leave to dry.  I find a bit of polystyrene is good to stick them into or you could use blue tack or similar.

You should end up with something like this:
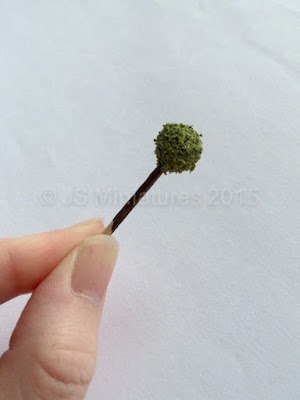
1/48th Topiary Ball Tree - after scatter
Once dry you can add additional scatter with drops of glue in any bare patches.

For the 1/48th scale topiary ball trees I used some florists wire twisted together for the trunk.

1/48th Topiary Ball Trees

I still need to get a pot for each of these!

Materials Required:
Links provided where I sell the items

Polystyrene balls (I have these, just need to update the website so please ask if you'd like some)
Green scatters
PVA glue
Cocktail stick or paper covered florists wire
Brown acrylic paint
Hairspray or artists matt sealer


I hope you have enjoyed the tutorial and find it of use.  More tutorials coming soon.

Jennifer,


15 May 2015

Tutorial - Curved Fencing

Following on from the launch of my landscaping materials last week I thought I'd do a quick tutorial on how easy it is to bend it to create curved fencing.

If you want to create that unique look not possible with standard plastic or wood fencing then this is the tutorial for you!

The wood pulp board used for the fencing is a very versatile and unique product.  It doesn't separate into layers like matt board or cardboard and comes in various thicknesses.  It's also suitable for laser cutting meaning it's easy to create intricate designs that don't break the bank.

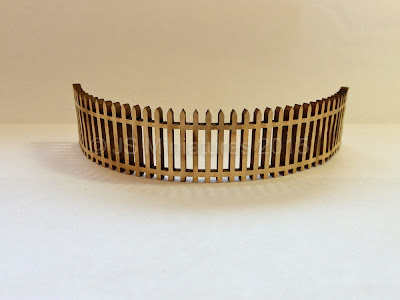
One of the killer features of this board is it's ability to be curved and then retain that curve once dry.  I've already used it successfully on a previous collaboration with Quernus Crafts for Christmas.

Curved Fencing Example
So without further ado...

Tutorial:

Step 1:  Find a suitable sized container that has the right sized diameter for the curve you want to make.

Step 2:  Take your piece of fencing and using your fingers, dampen both sides with water.  It shouldn't be dripping, don't run it under the tap, just enough to dampen the surface.  Shake off any excess.

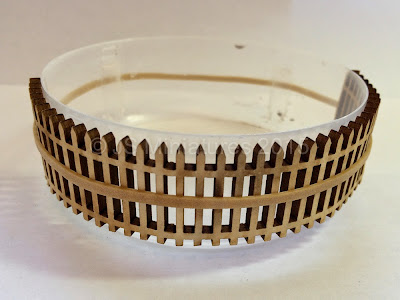
Step 3:  Starting at one end, carefully bend the fence around the container, working your way around and then hold in place with an elastic band.  I used the top off a ear bud tub that I use for holding paint etc.

Dampened fence curved round container and held with elastic band

Step 4:  Set aside and leave to dry.  Should only take an hour.

Step 5:  Take off the elastic band and you should have a curved fence.

Dry and curved fencing

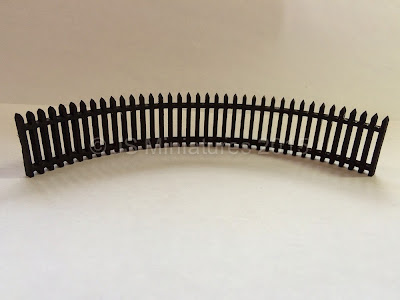
Step 6:  Paint in the colour of your choice.  I used Decoart Crafters Acrylic and one coat of black was enough.  White may need 2 coats.  You can leave it natural or stain for a wood effect if you wish.

Painted curved Fence

Painted curved Fence

Step 7:  Glue in position using PVA glue.  Wood glue or tacky glue are best.  There is flexibility in the fence so you can tweak the curve a little if you need to.

Fence posts and a gate are provided so panels can be joined together at corners.

And that's it!  Simples!

Hope you enjoyed the tutorial,

Jennifer,