18 October 2013

A busy week

This week has flown by.  I suddenly realised this morning that it was Friday and I had a blog post to write.  At that point I had a bit of a panic.  What have I got to tell you about?  It's been one of those weeks where there's been lots going on but not necessarily things that you would find interesting.

So, I had a look at my blog list and discovered that an exciting publication is out.  A while back I blogged about providing LED lights for Orsi Skulteti for her recreation of 221b Baker Street from the Sherlock BBC TV series.  (Using LED Lights in a kitchen)  A while ago she contacted me to tell me she had been asked to write asn article about the making of her kitchen for the Spanish magazine "Miniaturas" and she asked if it would be ok to specify me as a supplier.  I quickly agreed.

According to her blog the magazine has now been published so if anyone gets the magazine you can look out for the article.
This is her blog post: Orsis Minis - Miniaturas article

Miniaturas Magazine
Miniaturas Magazine

Other than that I've been busy with orders and I have been preparing the sleighs and reindeer for Kirsten Miller or Quernus Crafts.

It looks like a small army!  Here they all are, glued up ready for painting.  The first coats of paint are on so I'm hoping to have these finished soon.

Reindeer & Sleighs for Quernus Crafts

I am planning to have these available for sale and also as a workshop at the brand new Wonders In Miniature online fair in November.

The fair will run from the 8th - 11th November and is all about holidays from around the world.

Keep a look out for updates soon!

Jennifer,


11 October 2013

New arrivals....

Hot off the laser cutter I am very excited to announce the arrival of my Christmas products for 2013.

Last year you may have seen or bought my big sleigh and Rudolph models.  This year I have expanded this range and now have 3 smaller sets so you can buy one for 1/48th, 1/24th or 1/12th scale or they can just be a lovely ornament as part of your Christmas decorations.

The photo shows them just unpacked and assembled straight out of the box!

Sleigh & Reindeer laser cut kits
Laser cut kits - from left to right: 1/48th set, 3" Sleigh set, 1/24th set and 1/12th Sleigh with Rudolph at the back
I am also very excited to be working with the very talented Kirsten from Quernus Crafts on a collaboration for Christmas.  The 3" kit has been specially designed for a very special Santa!

Meet Santa mouse who is all ready to deliver his presents for Christmas.

My 3" sleigh & reindeer prototypes with Santa mouse by Kirsten

This was the prototype design so the keen eyed amongst you will notice that the reindeer now have 4 legs!  These sets will be available from Kirsten at the Country Living fairs in Glasgow and Harrogate at the end of November and also through her website leading up to Christmas.

Now the kits have arrived I just have to get 8 of them made up and painted for her.  Busy days ahead!

I'm still finalising the packaging but if you are interested in pre-ordering a kit then please comment or send me an e-mail.

Costs are as follows:
1/48th Scale Sleigh & reindeer @ £4.99
3" Long Sleigh & Reindeer @ £5.99
1/24th Scale Sleigh & Reindeer @ £8.99
1/12th Scale Sleigh & Reindeer @ £14.99

1/12th scale sleigh and Rudolph are also available separately:
1/12th scale Sleigh @ £12.99
1/12th scale Rudolph @ £5.99

I can also paint them for you.  Please inquire for costs.
1/12th Scale (8" long sleigh) & Rudolph assembled & painted


Best wishes,
Jennifer,


4 October 2013

New Products and Updates!

Following on from my tutorial last week about installing LED spotlights in a room box I have now added 3 new spotlight kits to my website to make it very easy for you to have a go!

These include a kit for a shop window or frontage with 2 LEDs, holders and battery kit, a 6 LED kit for a standard room box and a 10 LED kit for a large room box.  They are also suitable for a dolls house 1/12th scale room.
LED Spotlight Kits
LED Spotlight Kits
Kits include:
3mm High brightness LEDs (you can choose from warm white, white or blue for a witch or fairy room)
LED holders (choice of options)
3 volt AAA battery kit
Full instructions with photos (PDF)

Buy a shop window kit
Buy a standard room box kit
Buy a large room box kit

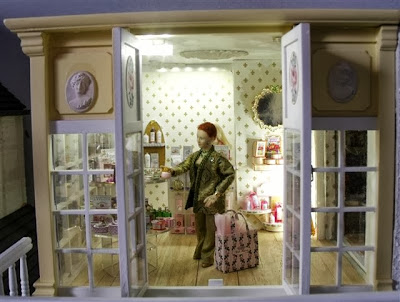
I have also updated my customer gallery.  If you are looking for inspiration it's well worth a look.  This week I added a photo from Barbara Adair who has bought several of my pre-wired flexible LED strips to light her shop boxes.  Here is her Scent Shop room box lit with 6 LED bright white strips.  They are nice and bright and a very affordable option.  All run off a 12v supply, usually a 12v regulated transformer.  They can be powered by a 9v battery but they are dimmer and the more strips you add the quicker the battery will run down.

LED strip lights in a scent shop room box by Barbara Adair

Another new section I have added to my website this week is for power supplies / transformers.
I have a regulated plug in transformer that will power from 1 to 50 LEDs and the voltage is adjustable so you can set it for use with 3v, 6v, 9v or 12v.  You can only use it on one voltage at a time but it does allow a bit of flexibility if you would rather use mains power rather than a battery to light your miniatures.
These are the modern type of digital transformer so they're small in size, efficient and quiet making it a good choice for your lighting.  They are also regulated meaning the power output won't spike making them perfect for powering delicate electronics like LEDs.

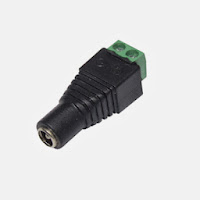
It comes with a selection of plugs, but for use with my LEDs you can purchase a 2.1mm socket to terminal block connector so you can fix the wires from the LEDs in one end and then simply plug it into the transformer plug.  Simples!

2.1mm Socket to Terminal Block Connector
3-12v Transformer
3-12v Transformer

 Visit the power supply page

Finally, I am hard at work on my christmas range and hope to have pictures and final details very soon. Watch this space!

Best wishes,
Jennifer,


27 September 2013

Tutorial: Installing LED Spotlights in a room box


I have had a few inquiries about ceiling spotlights recently and one of my customers has successfully installed them in a modern art gallery shop box to display her miniature paintings so I thought it was the ideal opportunity to do a quick tutorial to show how easy and effective they are!

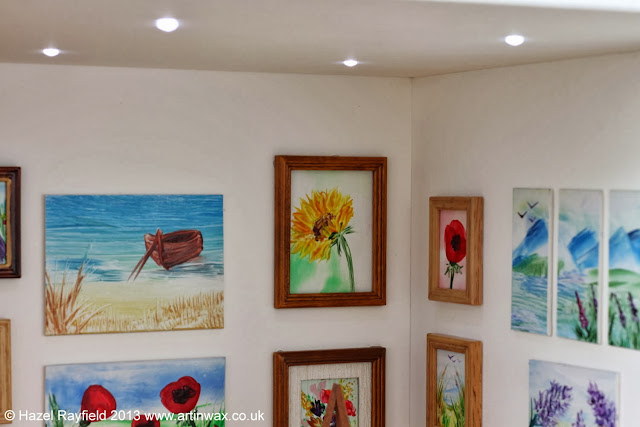
Firstly, this is the interior of Hazel's finished room box.  She wanted to create a modern art gallery that was well lit with even lighting which would show her paintings to best effect.

I suggested using 3mm high brightness LEDs with clear lens clips which hold the LED in place and also act as a diffuser, spreading the light and making it very even  (Standard round top LEDs normally produce a spotlight effect).

Finished art gallery with LED spotlights
Close up of LED spotlights
 Based on her requirements I did a couple of tests with a cardboard box of similar size to her room box and that gave a light spread of about 3 inches per LED meaning they can be spaced at 6 inch centers (150mm) to provide even lighting.
I drew up the plan below in CAD.  It shows the LEDs at 6 inch centers (150mm) and Hazel also wanted three additional LEDs for the shop windows and the front door.


CAD plan for layout of LED spotlights
For the clear lens clips the best way to install them is to mark out your layout on the exterior of your room or room box and then drill 4.5mm holes at each location.
Depending on your room or box you can either make grooves for the wires using a dremel, or by hand.  You can then secure the LED and wires in place with masking tape over the top or, if you don't want to make grooves you can just stick the wires down with masking tape and cover with your flooring or roof material the same as you would usually do with lighting wires.

The clips are designed for 3mm thick material but this can be worked around by drilling a slightly larger hole (ie 4.5mm) and if necessary, the clips can be glued in position with tacky wax or superglue or similar.  Just a tiny drop in the hole to secure.  I find the clear clips tend to hole pretty firmly though without glue.

Clear lens clips  - installed in a ceiling (demo)
Clear lens clips  - installed in a ceiling (demo)

Once the clear clips are in position you simply push the LED into the clip until you hear a 'click'.  It's best to have one finger on the 'spotlight' so the clip doesn't get pushed out of the hole.

Once you have positioned all the wires you should then have something like this:
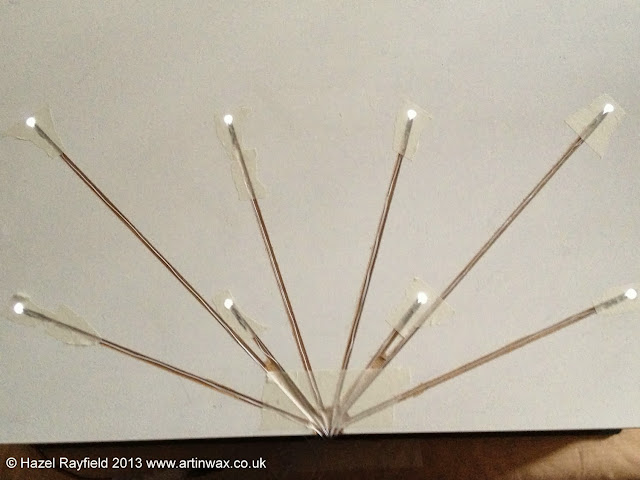
External view of room box roof showing LED wiring in grooves
Once the LEDs and wiring are installed you can connect them up to your power supply.  In this case all the LEDs are powered off a 3 volt, 2 x AAA battery kit.  The 3 LEDs in the shop frontage were powered off a separate 2 x AAA battery kit so the front can be easily removed.  A small connector block was used to connect the LED wires to the battery wires.  It ensures a good connection and makes wiring very simple.  No soldering required.  This makes it a very effective but simple solution and ideal for portability.

This was a very large room box - the Victorian Shop Box kit from the Dolls House Builder which is 23" L x 16" W x 12" H (590 x 400 x 298mm) which is a huge shop!  The entire spotlight kit including 11 pre-wired LEDs, 11 clear lens clips and 2 AAA battery kits only cost £30 so it's a fairly cost effective solution.

The LEDs were wired with the white wire found in all dolls house lighting which has the advantage of being flat and so very neat to hide but it is slightly more expensive than the standard red & black wire I can also supply.

Other clip options include black ring clips or brass or nickel metal 3mm eyelets.  Top row shows each clip with a 3mm LED installed.  Lower row is the clips on their own.
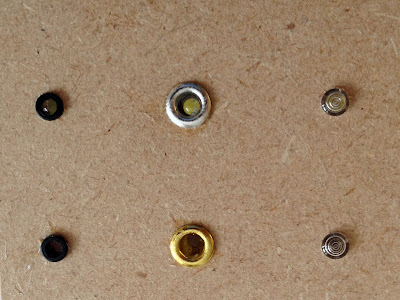
Spotlight clip options

If you'd like to read more about the creation of Hazel's Art Gallery with lots of finished photos including the shop frontage, click on the link: Hazel Rayfields Art in Wax Blog.

I'd like to thank Hazel for allowing me to use the photos of her finished art gallery.

I hope it's a useful tutorial and perhaps inspires you to try something similar.

Jennifer,

***UPDATE***

If you would like to try your own spotlight ceiling you can purchase a ceiling kit here:
Ceiling Spotlight Kits

There are three options to suit different sizes of project or room.

This tutorial is for personal use only and must not be made for sale or commercial purposes.  All text and photos copyright of JS Miniatures.


20 September 2013

The dreaded 'T' word...

Yep, Tiding, also associated strongly with 'cleaning' and something not many of us are too keen on.

It's one of those rare things where it always seems to get much worse before it gets better.

Having gained the office as my workspace as mentioned in my post last week "A space of my own"  I have been gradually moving all my supplies and materials into the office in a bid to avoid the current situation where there's stuff everywhere!

I still have a long way to go but I made a start yesterday on my LED supplies.  I was looking for storage options and came across "Really Useful Boxes" and it turns out, they are really useful!

I bought a 5L XL organiser pack which came with a 5L XL box with lid and inside was 6 x 0.2L boxes and 3 x 0.3L boxes in their own compartment tray which can be used on it's own or stored inside the 5L XL box.  Nifty!

I chose the 5L XL box as it was perfect in size for my various packs of LEDs and resistors so I made some colour coded dividers and put them all in the one box.  Much easier than sorting through various bags and keeps them all together.

5L XL box for LED storage
LED storage
I used the other smaller boxes for other bits and bobs such as batteries, wire and switches.

I have another larger compartment tray with 16 x 0.3L boxes and plan to use those for some of my other dolls house miniature supplies such as clay, beads, etc etc.

I'm saving that for another day.....


13 September 2013

Resistance is Futile!

Do you ever see a new miniature on a website or Facebook and think "I've got to buy that!"?  You then wrestle with your head v's heart asking questions such as...
1) What will I use it for?
2) What will (insert name of significant other) say when they find out?
3) What about all my other unfinished projects?
4) But it's only (insert cost)...

Your finger hovers over the "buy" button, perhaps even adding it to the cart and then changing your mind as you continue your silent dilemma.  You leave it for a while and find yourself going back for another look, maybe you even see another post about it on Facebook or Twitter teasing you while you try to make up your mind.

But we all know what happens in the end... don't we?!

You decide (insert name of significant other) won't mind once they see how amazing it is, how wonderful all the little tiny details are.  The question of "HOW MUCH??!" won't even be uttered.  You see the finished piece in your dolls house or miniature scene and you just have to have it.  There's probably even a few other things you add to the cart as it saves on postage right?  It's not that much money really....


.....So, what did I buy?

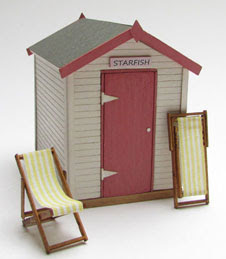
Well, it was only a small purchase..... it all started when I saw a post on Facebook by Miniatura Show showing the new kit available from Jane Harrop for Miniatura in a couple of weeks time.  I didn't think it would be available for sale yet but I went to her site and there it was, on the home page, calling to me....

Jane Harrop 1/48th Beach Hut Kit
1/48th Scale Beach Hut Kit by Jane Harrop

I almost bought it instantly... but then the questions started and I hesitated. The next day, there it was again and by that time it had evolved into a seaside scene in my mind and I couldn't resist.
I have a new found love of the smaller scales.  They are a bit fiddly but you can finish your purchase in a few hours or at most a weekend or two, so the satisfaction of completion is a great reward and they're relatively cheap by 1/12th scale standards.

Now all I have to do is find time to make it....

Like I said....

.....Resistance is Futile!


1/48th scale Beach Hut by Jane Harrop


10 September 2013

A space of my own...

A couple of years ago we turned our box room into an office come storeroom and up until now it's been used by my fiancĂ© as his office while he's been working from home.  That has meant that I've been using various parts of the rest of the house for my JS Miniatures tools and materials, but mostly the dining room table has been my workspace.  Obviously this isn't ideal as I have stuff everywhere in various cupboards or lying about.  I'm sure there are a few of you who know exactly what I'm talking about!

With plans to redecorate the living/dining room this year we have swapped rooms so I have the office as my workroom. Finally I have a space I can call my own and it's pretty ideal.  A nice big window, plenty of natural light and ventilation and storage space for all my supplies.
I'm sure it'll help me be more organised too.

So hear it is:
My workspace
My workspace
Pretty tidy at the moment - the tricky part is keeping it that way!

*cough* ok, so the photo was taken before I started working in it and I confess, it's already not as tidy... but I'm trying... honest! :)